Sunday, February 27, 2011

Drawing the Eye: Post Processing (Part 2 of 2)

Post Processing
Using post processing can be a very effective way to draw attention to your subject. It can also be overdone like most everything in post so be careful. You are looking for subtle changes in most cases. Here is a quick list of how you can use post processing to draw the eye.

• Minor Vignette: A vignette is a darkening of the edges of the photograph. This was done with most B&W images in chemical darkroom back in the day. Now we have a quick slider we can use in the digital dark room to darken the edges. This is very effective if the subject takes up most of the image and is not too close to the edge. If it is too close then the darkening will darken the subject and as previously mentioned this hinder the eye going directly to the subject.


• Brushes and Layers: If your subject is close to the edge or in one of the 4 quadrants for the rule of thirds a simple vignette may not work. You can still use the same idea as a vignette but with a minor difference. You make the choice of the exact spot in the image to keep bright. If you are using Lightroom 3 then simply paint the entire image down about a stop of exposure. Then erase the area you want to be brighter; adjust as necessary. If you are using Photoshop then create a duplicate background layer, darken it, and then mask out the area of the image you want to brighten. I will do a video tutorial on this in the near future.
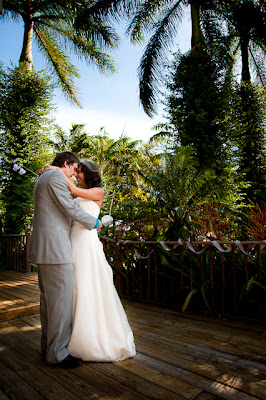
• Brighten the Eyes: The eyes are so important. If you have an individual as your subject and the eyes are sharp in focus there is a way you can draw the eye even more. Lighten and saturate the eye ever-so-slightly. This can be done in both Lightroom and Photoshop.

• Color Saturation: Depending on the subject one thing you can do is to add a bit of color saturation to pull the viewer into the image. For instance if you are photographing a bird with a bright red head (like a woodpecker) you can add a bit of red saturation to bring attention to an aspect of the subject. Just be careful here not to add too much or it starts to become a special effect rather than enhancement.

Just remember when you use post processing it is very easy to overdue anything.  This is no exception.  What is overdone?  Well, that is subjective.  Only you and your clients/audiance can determine what is too much.  Thanks for reading!

Friday, February 25, 2011

How to Buy Prints

This is just a quick tutorial on how to buy prints from the Eldridge Studios website.  It is just eaiser to show folks verses having to e-mail them or try to explain it over the phone.  Enjoy!

Tuesday, February 22, 2011

Drawing the Eye: Elements Within (Part 1 of 2)

Every good image has a subject. Not only does it have a subject but your eye is drawn to that subject by either elements within the photograph or through some method of post processing. This post will deal with the Elements Within the photograph. One fundamental rule you can remember is that the human eye is typically drawn to the lightest part of the image first.


Elements Within
This is clearly the most effective way of drawing attention to your subject. You can do this through a variety of methods. Here is a quick list of what you can use:
• Exposure: You have to understand the technical aspects of photography in order properly show your artistic vision. Watch out for blown out highlights around the edges of the frame. If you are going for a blown out look it may be effective but if that is not your intent it can be very distracting.

• Leading Lines: These are items in the photograph that show lines leading directly to the subject.

• Sharp Eyes: If you are photographing people or animals it is vital to keep the eyes in focus. If the eyes are out of focus you have missed the image. Why? Because our eyes are instantly drawn to the eyes of other creatures. It is just the way we as humans are designed.

• Rule of Thirds: Using the rule of thirds helps to improve your overall photograph but it also acts as a draw to the subject (provided the subject is defined). Again, you should not always use this rule for every photo but you will find it effective most of the time. Make sure that you understand the rule before you break it.

• Depth of Field: This is a fantastic method of drawing the eye. If you have a very shallow depth of field (wide open aperture) then the area behind the subject is blurred. This causes the subject to be separated from the background drawing the eye.

• Flash: This is probably one of the most under used tools at a photographer’s disposal. If you lower the ambient light by about one stop +/- and light the subject with a flash you have an instant way to pull your viewer to your subject. This may be a video tutorial at some point in the future. Check out “Captured by the Light” by David Zizer for great instructions regarding this aspect.


You must really consider your subject and how the environment and/or the in-camera choices you make draw the viewers eye.  Look soon for the follow up post;  Drawing the Eye: Post Processing (Part 2 of 2).

Wednesday, February 16, 2011

Panoramic Photography

Here is another quick video tutorial.  This one is on Panoramic Photography.  If you have any questions feel free to send me an email or call.  Enjoy the video!

Wednesday, February 9, 2011

Thinking of Getting Started?

I get asked a question often and it usually goes something like this:

“Hey Jason, I have been thinking about upgrading to a better camera. Do you have any suggestions?”

Most always say that they want a really good camera that will not break the bank… In photography there is always a trade off. Really good simply costs more of money. There is a bright side with the camera bodies though. The image quality from your entry level DSLRs all the way to the professional “crop” sensor cameras is pretty much the same. When you get into the full frame sensors the image quality does increase slightly due to the larger sensor size. However, most people (including me) would not be able to tell you what type of camera took a specific image. See my previous post on the Equipment Caveat. What you get for more money in the camera body is more options (bells and whistles).

The lenses on the other hand are a different story and when you go to upgrade them you should save your money and get the best/fastest you can afford. The lenses will out last any camera body you buy and are the largest contributors to image quality that you have. For example, all of my pro grade lenses were bought about 11 years ago when I first really got into photography. I still have and use these lenses for my work today. Since then I have changed cameras three times. There have been updates to the ones that I own with a few tweaks but the glass is still of the highest quality.

I would recommend staying with Canon or Nikon when purchasing DSLR equipment. The reasons are simple… They have been around for a very long time and have a complete system. Some of the other manufactures have great cameras but limit the options that you have for advancement. Personally, I am a Nikonian but Canon can produce images of equal quality (yes that was hard to say). This does not hold true with point and shoots because you buy the camera and there are no accessories to add. (pst….I would still stay with Nikon or Canon).

Here are 8 suggestions when thinking of an upgrade or initial purchase.

***REMEMBER THAT EQUIPMENT DOES NOT MAKE YOU A BETTER PHOTOGRAPHER***
*It is just a tool.  If I buy the best scalpel made I don't think it would make me a good surgeon.*

1. Simple Point and Shoot

     o Nikon: CoolPix S5100 - $154.95
     o Canon: PowerShot A3100 - $139.95

2. Advanced Point and Shoot (hybrids)

     o Nikon: P7000 - $499.95
     o Canon: G12 - $434.95

3. Entry Level DSLR Kit (includes 18-55 lens)

     o Nikon: D3100 - $644.95
     o Canon: Rebel T1i - $649.00

4. Intermediate DSLR Kit (includes 18-55 lens) – Amateur

     o Nikon: D5000 - $629.00 (discontinued…expected replacement  Feb. 2011)
     o Canon: Rebel T2i - $799.95

5. Intermediate DSLR body only – Semi-Professional to Professional
    
     o Nikon: D7000 - $1,199.95
                   D300s - $1,449.00
     o Canon: 60D - $969.00
                    7D - $1,479.00

6. Professional body only DSLR

     o Nikon: D700 - $2,349.00
                   D3s - $5,199.95

     o Canon: 5Dmk II - $2,499.00
                    1Dmk IV - $4,699.00

Below are the lens suggestions. Keep in mind that the focal lengths you really need to cover are from 24mm to 300mm if possible. The suggestions are zoom lenses because they give you that coverage.

7. Lens Suggestions – General

     o Nikon: 18-200mm f3.5-5.6 - $759.95
                   70-300mm f3.5-5.6 - $519.95

     o Canon: 18-200mm f3.5-5.6 - $595.00
                    70-300mm f3.5-5.6 - $529.00

8. Lens Suggestions - Professional

     o Nikon: 24-70mm f2.8 - $1,699.95
                   70-200mm f2.8 - $2,159.00
                   300mm f4.0 - $1,344.95

     o Canon: 24-70mm f2.8 - $1,329.00
                   70-200mm f2.8 - $2,374.00
                   300mm f4.0 - $1,376.00

There are far more expensive lenses than the ones I mentioned. Some even reaching as high as $15,000.00. I didn’t really see the point in listing those. For reference all the prices listed were taken from http://www.bhphotovideo.com/.  I buy most of my gear from them but I am in no way associated with the company.

I hope that you have enjoyed this post. I know it was a bit longer than normal but there is so much to cover. This is by no means a comprehensive list but rather a starting point should you decide to upgrade or make an initial purchase.

If you are intersted there is a tab at the top of the blog page that links to the equipment that I use.  Take a look and ask any questions you would like.

Thanks for reading!!!

Monday, February 7, 2011

Street Photography

I had no experience in street photography prior to the trip to Cotorro, Cuba. While in Cotorro I had to do a lot of walking; in fact that was my primary mode of transportation while visiting. Obviously this was an incredible opportunity to photograph life in Cuba. Here’s the rub…

Street photography is something that always interested me but I wasn’t sure how to get started. From the photographer’s perspective it can feel very intrusive as you photograph the lives of people you don’t know (at least for me it does). That comes from a feeling that the privacy of the individual is being violated. I mean, here you are walking along and some guy with a monster camera starts taking photos…  Many photographers say that there is no sense of privacy while you are in a public area. I know legally (in the US) that is the case but I often feel there is a moral issue to address.


While in Cotorro I did find that the universal signal of “can I take your photo” was effective. What is the signal? Hold the camera up, look at the individual, and point to the camera. In my experience 100% of the time they are just fine with that. I did use the universal signal a few times but quickly found that the result was a canned photograph.


I decided that this was a once in a life time trip and that photographing the real streets of Cuba was something I needed to do.  If there was any opposition then I could explain it to the individual and probably be just fine (with the help of the translator of course). I didn’t encounter anyone who had an issue with their photograph being taken.  There was one official that took interest when I was shooting portraits near a school.  Once it was explained that the school was not in the photograph all was well. The rule I learned quick was; If it looks official it is off limits!


I hope you have enjoyed these photographs. Drop me a comment and let me know what you thing.

More to come!!

You can see more of the images captured while in Cuba here:

Sunday, February 6, 2011

Separating your Subjects

There is one thing that as a DSLR user that you have over a point and shoot.  Aperture control.  This can be one of the most powerful tools you have to create good looking photographs.  The wider the opening (lower the f-stop) the more shallow the depth of field.  You can check out a full blog post that I did on aperture if you want to know more.  Check it out here.

This blog post is about separating your subject from the background.  I have three examples below from my recent trip to Cuba.  The first one below I used a small aperture to ensure that the city in the background was in focus almost as much as the subject.  I was able to get some separation from the background by getting low and shooting up.  This puts the horizon just below his chest and his upper body pops off the blue background.


Overlooking Havana, Cuba


The next example here I used a larger aperture blurring the background.  When you have a person in front of a blurry background there is a sizable amount of separation.  Your eyes do not get confused and tend to go directly to the subject.


I saw the door that is in the background and thought that it would make a fantastic backdrop for some portrait work.  I positioned the individual about ten feet in front and used a long lens with a wide open aperture.  This allowed me to compress and enlarge the background and blur it at the same time, providing excellent separation.

Wednesday, February 2, 2011

Photography is Art

Guest blogger:  Angeline 

Since photography became available to just about everyone, the debate continues: is photography considered art? The answer is YES. Just like in the more classical arts such as painting and drawing, there is good and bad photographic art. Since there is an opinion of good and bad, photography can be considered art.

Seems like a simple idea: if a judgement of good or bad is possible, then photography is considered art. Art is in the eye of the beholder, but even the beholder can tell if the quick snapshot belongs in a magazine or in the trash. How many times have you taken a photograph of the same scene, at the same time, but your photograph does not process as wonderfully as the person's photograph that was with you? How many times have you had to buy the vacation postcard because you know your photograph is not going to be up to standard? The postcard is a art photograph: the artist waited, timed, captured, and processed the image to fit most people's ideal of the scene. Therefore, art is inherent in the photograph and photography is art.

As a painting artist, I am aware of how much effort it takes to create a beautiful photograph. For instance, it may take me an hour to finish a beautiful 20 x 30 painting, but there is a lot you do not see that happened before that hour. I have taken workshops, studied books and videos, consume podcasts, read magazines, observe places where I live and vacation, browse through my reference photos…etc. A photographer does so much work just before taking that seemingly instant image. Photographers wake up early and/or miss dinner. Photographers travel, carry gear, and sweat. Processing, whether in a traditional dark room or a software program, takes patience and time. Photographers take workshops, study books and videos, consume podcasts, read magazines, observe places, and you get the idea. A photograph may seem quick and simple, but the photographer's skill, experience, and talent all come into play when you see the final results, just like the large painting that you saw only took an hour.

Just as in paintings, photography is art. There is both good and bad art just like good and bad photography. Painting and photography artists all strive for the same thing: to share and communicate how we feel about the world around us visually.

Jason's examples:
The first photo below is from my recent Cuba trip and is a standard properly exposed image.  I took a 3 shot bracketed photo of this car for the purposes of HDR photography.  The HDR photograph is the second image.  Some will like the first and some will like the second.  There are some out there like me who like both.  The moral of the story?  Art is subjective and each individual has styles and looks that appeal to them. 

Thanks so much Angeline for the guest post and I can wait to see your next one.


Photo from Cuba


HDR Photo from Cuba